*This post may contain affiliate links. Please see my disclosure to learn more.
I know that it was a bit overwhelming when I was first getting started with self-tanners.
Not only were there endless numbers of products on the market to choose from, but I didn’t know where to start.
I didn’t want to risk ending up with an orange tan, or tons of streaks, or a color that doesn’t match my body.
It took a lot of trial and error and horrible tans before I finally found products that worked for me.
I want to help you avoid a lot of this trial and error and jump straight to a beautiful bronze glow.
In this guide, we’ll discuss the absolute best self-tanners for beginners! I’ll explain why I think they are so great and tell you where you can get them.
After I review all the products, I’ll give you a simple, fool-proof guide to applying self-tanner even if you’re completely new to it!
Alright, let’s get started!
5 Best Self-Tanners For Beginners
I am extremely proud that people trust my reviews and recommendations, and I don’t take that honor lightly.
I have been self-tanning for years now, and have tried hundreds of products. I always bring my experience into everything I write and recommend.
I also always thoroughly research products, read customer reviews and experiences, check ingredients, and more.
So you can rest assured that I don’t just recommend things randomly, I take many hours thoroughly reviewing, researching, and testing anything that I suggest.
So when I chose these 5 self-tanners for beginners, I took into account:
My experience
Price
Customer Reviews
Quality
Ease of application
… and much more.
Alright, enough blabbing, let’s get to those reviews!
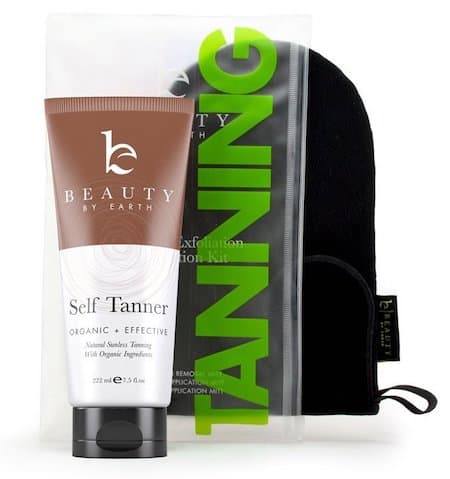
Alright, we’re going to start off with Beauty By Earth, which happens to be my current favorite self-tanning product.
Not only is this stuff an absolute sensation on Amazon rising to become one of the best-selling, and best-reviewed self-tanners in the world, it also happens to be extremely simple to use.
If you’ve read many of my “best of” guides, you’ve probably come across this recommended before. That is partly because it is just such a great product, but also because it is completely organic, paraben free, and chemical free.
Many people turn to self-tanning products to protect their skin from sunburns, early aging, and skin cancer risks associated with UV rays from tanning beds and the sun.
If you use an inferior self-tanning product that is full of chemicals, you’re taking two steps forward and one step back.
Alright, now let’s talk a little bit about why I think this is such a good beginner friendly self-tanner. First of all, the link I gave you above is to the kit that they sell, which comes with everything you need to apply this stuff perfectly.
You can also just get the self-tanner itself, and if you do, make sure you check out this guide to make sure you get a streak-free tan.
The kit comes with:
Applicator Mitt
Face Application Glove
Exfoliator Mitt
Self-Tanner
Waterproof Carrying Bag
You’ll have everything you need to apply a perfect self-tan over your entire body, even if you’re brand new to self-tanning.
The product itself is exceptional, which is why just about everyone loves it. Unlike some of the self-tanners on the market, Beauty by Earth works for all skin types, including dry, oily, dark skin, fair skin, or just about anything else.
You can easily control how dark the tan is by altering how much product you use and how many applications you choose to do.
The tanning solution itself (which is organic DHA) is suspended in an organic moisturizer so it helps to keep your skin soft, supple, and well moisturized, which is extremely important to maintaining a great fake tan.
You can layer the self-tanner to get the color you want while also covering up any blemishes, veins, blotches, dark spots, or imperfections of any kind, which makes this such a great beginner-friendly self-tanner.
Don’t worry, we’ll talk about how to apply it towards the end of this guide.
Currently, I think this is the absolute most beginner-friendly self-tanner on the market, so I’d love for you to give it a try!
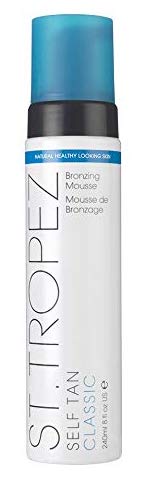
Alright, now let’s talk about another one of my absolute favorite self-tanners, and the one I was using most often until I recently switched to Beauty By Earth.
If you know much about self-tanner (which maybe you don’t, considering the article you’re reading) then you’ve heard of St. Tropez. They are an absolute staple in the self-tanning market, and for good reason.
St. Tropez has long made some of the highest-quality self-tanners, and they have always been popular.
I personally always found this self-tanner extremely easy to apply, and the color came out looking extremely natural.
Since it is a mousse, it will dry quickly, allowing you to easily control the tone and shade of the tan.
Remember that the longer a self-tanning product with DHA sits on the skin, the darker the tan will be, but it can also be a little harder to control.
This product happens to be paraben, sulfate, and phthalate free and uses only naturally-derived DHA.
You can get this same product in a darker shade, but for a beginner at self-tanning, I would suggest you start with the classic.
When you get to the Amazon listing, you’ll see that they suggest a bundle option. If this is your first time, I might suggest trying this.
You’ll get the St. Tropez self-tanner, an application mitt, and their gradual tan daily moisturizer. This combination is great for maintaining a tan for a while. If you’re just looking to get a tan for a special event, then at least get a quality self-tanning mitt.
This is another extremely popular product that is very well reviewed.
You’ll notice that some of the most beginner-friendly self-tanners are also some of the most generally liked and well-reviewed self-tanners.
This is likely because these products are easy to use and relatively foolproof, so the results are really consistent.
If you use a self-tanner a few times, and every time you are getting streaks, or blotches, or an unnatural color, you’re not likely to order that product again or give it a great review.
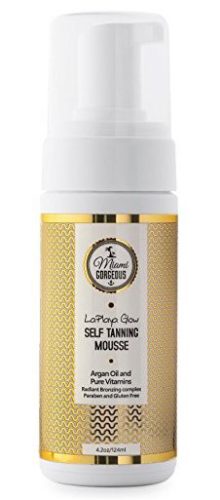
This self-tanner from Miami Gorgeous is extremely easy to use and simple, producing a beautiful natural tan.
The product is infused with argan oil, coconut oil, jojoba oil, elderflower extract, and Vitamins A, C, and D. These ingredients combine to leave your skin feeling fantastic.
Like the other self-tanners on this list, this one is gluten-free and parabens-free, and the DHA is eco-certified.
I’ve tried this self-tanner many times myself. I always found it really easy to apply and loved the tan it produced. The bottle contains about enough self-tanner for 10 full-body uses.
If this is your first time, I would suggest you get a mitt to apply it with!
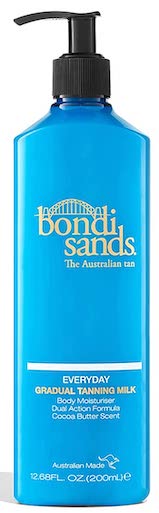
Bondi Sands Gradual Tanning Milk I perfect for beginners because. itis gradual, which gives you wiggle room when it comes to figuring out the best tan base for you.
You will notice a tan developing after 1-2 applications. After you have gotten the results you want, you can use it daily as a regular moisturizer in order to maintain your tan.
Since you need to exfoliate before each application, I recommend only applying this after exfoliating in the shower (which for some of us might not be every day).
No matter how often you apply this lotion, you can be sure that it’s a good choice for beginners and is more forgiving than more highly pigmented formulas.
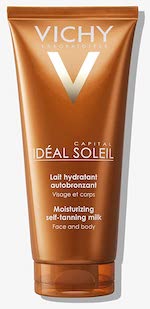
This might be the last product on the list, but it is by no means the last. In fact, this is my favorite self-tanner for people with psoriasis or sensitive skin.
Is dermatologist-tested, paraben-free, and is an amazing self-tanner for beginners.
This is also one of the easiest self-tanners since it only requires application 2-4 times per week. This means that you can retain a nice glow without having to exfoliate every single day, which is a huge plus for people with busy schedules.
If you are a beginner and want to start out with something safe and simple, Vichy Capital Self-Tanning Milk is probably one of the best options.
Alright, now that we’ve covered the best self-tanning and fake-tan products for beginners, it’s time to discuss how to use them correctly!
A Brief Beginners Guide To Self-Tanning
There are lots of things that you can do before, during, and after self-tanning to produce a great tan. I’ve written a few other good articles on this, but I want to focus this one on the basics.
These are the things that you really need to do every time you apply self-tanner. So, if you’re new to self-tanning, listen up!
1. Exfoliate
I harp on this all the time because it is so important, probably one of the most important steps.
The reason that exfoliating before self-tanning is so important has to do with how self-tanners work. DHA is the primary tanning ingredient in self-tanning products and spray tanner.
DHA, which can be derived organically or synthetically, chemically reacts with the outer layer of your skin.
This chemical reaction ultimately produces what looks like a real tan. The problem is, that if DHA interacts with excess dead skin cells, it will produce a patchy, inconsistent color.
So, what you want to do is exfoliate your entire body before you apply self-tanner. This gives you a smooth and even canvas to apply the product to.
I like to either use a good exfoliating mitt in the shower personally. There are lots of great exfoliating body scrubs you can use as well.
Don’t get one that is too harsh, as we don’t want to brutalize our skin; just get rid of the excess dead skin cells.
2. Shave and Wax
So, it’s essential to get your shaving and waxing done about 24 hours before applying your self-tanner. There are two main reasons for this:
We want our body to be smooth so the self-tanner can apply evenly.
We don’t want to have to shave in the days immediately after self-tanning.
So, shaving or waxing about 24 hours in advance will give your body enough time to heal, so there are no micro-cuts or redness to affect the self-tanner.
Remember not to shave or wax right after you use fake tanner. As we discussed above, the color produced by the DHA lives only on the outer layer of your skin.
Shaving or waxing will simply remove this outer layer, making your tan look blotchy. This is one of the most common mistakes I see beginners make.
3. Moisturize
Alright, next up is moisturizing, which is also really important.
Again, if you want to get the full guide on moisturizing before, and after, self-tanning, take a look at this post here.
Now, there are a few nuances here that I want to make clear because if you’re new to this, it’s essential.
Before you apply self-tanner, you want your skin moisturized, but you do not want to have freshly applied moisturizer.
The main reason for this is that the self-tanner might not apply correctly. Also, nearly all of the beginner-friendly self-tanners I mentioned above already have moisturizer.
So, in the days and weeks before applying self-tanner, try to maintain a good moisturizing routine. Don’t use moisturizer right before self-tanner.
Keeping your skin well hydrated will help the tan to last longer. If you let your skin dry out, it can start to peel, and your tan won’t look natural.
4. Apply
There are many ways to apply self-tanner, but if you’re a beginner, here is what I would suggest.
Start from your feet and work your way up. This makes it significantly easier to track the areas you’ve already applied to and keep things fairly even.
If you don’t have someone to help you with hard-to-reach places, like your back, I would consider getting a back applicator.
I have one, and I absolutely love it! You cancheck out this post to learn what the best ones are.
Don’t apply self-tanner to areas that are more likely to have dry skin, such as your elbows, knees, etc.
I just give these areas a quick swipe. They tend to develop more than other areas, so if you apply the same amount of product they can end up looking a bit darker.
5. Clean Up
If you used a quality self-tanning mitt than you really shouldn’t have much to clean up.
Don’t go too crazy. We still want a little bit of color left. Just use soap and wash your hands thoroughly. Make sure you get under your nails and between your fingers.
If we leave the product on our hands, they can overdevelop and get that fake, orange tan look.
Final Thoughts
I hope you enjoyed my guide on the most beginner-friendly self-tanning products! I promise that all of these are easy to use and apply and will give you great color!
Please let me know if you have any questions about the products or the guide. I would be happy to help!
I've loved tanning ever since I was pretty young. I realized over time that If I wanted to maintain a beautiful bronze glow, and not damage my skin, I'd have to learn to use self-tanners. This blog is a place for me to share everything I've learned! Curious what my absolute favorite self-tanner is? Find out here.