5 Best Tanning Back Applicators
Self-tanner is a convenient way to get a bronzed look without intentional UV exposure, but the back is one of the hardest areas to cover evenly on your own.
Most of us cannot comfortably reach the center of the back or between the shoulder blades, which is where streaks and missed patches usually show up.
That is where a tanning back applicator helps. These tools are designed to spread mousse, lotion, or tanning water across areas your hands cannot easily reach.
You can find both long-handled applicators and flexible strap-style applicators online, and each has a slightly different feel in use.
A good tanning back applicator makes it easier to cover hard-to-reach areas with a thin, even layer instead of twisting, overapplying, or missing the middle of your back.
The best design for you depends on your shoulder mobility, the self-tanner you use, and whether you prefer a brush, pad, or towel-style strap.
This guide explains how tanning back applicators work, how to use them without streaks, and five useful options to consider. EcoTools Good Tan is the best all-around pick here if you want a purpose-built brush, while strap applicators are easier if you prefer a towel-like motion.
What Is A Tanning Back Applicator?
A tanning back applicator is simply a tool that helps you spread self-tanner across your back without another person.
Most are easy to learn, but the best design depends on how much reach you have and which self-tanning texture you normally use.
One common design is a long-handled applicator with a brush, pad, or sponge at the end.
The long handle gives you extra reach across the shoulder blades and lower back. A wider head can make larger areas faster to cover, while a smaller head gives you more control.

Many pad-style applicators are washable and reusable. Check the care instructions before putting any pad or applicator head in a washing machine or dryer.
Another style uses a long strip of soft material with handles on both ends.
You place self-tanner in the center, hold one end in each hand, and move the material back and forth across your back much like drying yourself with a towel.
This style is useful if you want broad coverage and have enough shoulder movement to pull the strap from side to side.
The 5 Best Tanning Back Applicators
The main differences between tanning back applicators are the head material, reach, washability, and how much control they give you.
For this list, the focus is on applicators that are practical for self-tanner, easy to reach with, and simple to clean between uses.
We also considered product design, stated materials, versatility, and how easily each style can spread self-tanner without wasting too much product.
We factored in:
- Price
- Quality
- User Reviews
- Ease of use
- … and much more.
Here are five options, starting with the most self-tan-specific design:
1. EcoTools Good Tan Self-Tan Back Applicator

EcoTools made this applicator specifically for self-tanner, which is useful because many long-handled applicators are primarily designed for lotion or sunscreen.
The head uses soft bristles rather than a flat sponge, so it is designed to blend product over the skin instead of simply wiping it across the surface.
The long, curved handle is the main advantage. It gives you better access to the center of your back and across the shoulder blades.
It is most practical with mousses, lotions, and other self-tanners that can be worked into the bristles in small amounts.
Because a brush head does not absorb as much product as a thick sponge, you can usually start with less and build coverage gradually.
Clean the brush after each use according to the manufacturer instructions and let it dry fully before storing it.
This is the best pick here if you want a purpose-built self-tanning applicator with a long handle rather than a general lotion tool.
2. Slick Solutions Self-Tan Applicator

The Slick Solutions applicator uses a towel-style motion, which can feel more natural than trying to reach behind yourself with a rigid handle.
The soft fabric band covers a wide section of the back at once, which can make it easier to blend lotion or mousse across the center of your back.
Its flexibility is the main benefit. You can adjust the angle as you move it across the shoulders, mid-back, and lower back.
The applicator uses a stretchable microfiber-style cloth with handles at each end, so you have something secure to hold while blending.
You can also fold the fabric over for smaller areas, although a dedicated mitt may still give you more control on hands, knees, ankles, and feet.
Follow the care label when cleaning it. Washing out old self-tanner between uses helps prevent dried product from transferring back onto the skin.
This is a good travel-friendly style because it folds down smaller than a rigid handled applicator.
3. Vive Back Lotion Applicator

The Vive Back Lotion Applicator is a general-purpose long-handled tool that can also work for self-tanner.
It can be used with creams, gels, lotions, and similar products, which makes it more versatile than a single-use tanning tool.
The handle reduces how much twisting you need to do when reaching the center of the back, especially if your shoulder mobility is limited.
The 17-inch handle gives you extra reach, while the 3.5-inch applicator surface provides a reasonable balance between coverage and control.
The handle combines wood with a textured grip. The important practical point is that you should be able to hold it securely even if your hands are slightly damp.
A hanging loop makes it easier to store the applicator somewhere it can dry after cleaning.
The coated handle is designed for bathroom use, but the pad still needs to be cleaned and dried properly after each application.
This is a useful option if you want one applicator for self-tanner, body lotion, and other hard-to-reach skincare products. Use light pressure rather than scrubbing the skin while you blend.
4. ModelCo Self-Tan Back Applicator

The ModelCo Self-Tan Back Applicator is another strap-style option for reaching the center of the back without twisting.
The reusable fabric gives you broad coverage and works best when you spread a small amount of product across the center before pulling it across your back.
The soft material is designed to help distribute self-tanner more evenly than using your fingertips on areas you cannot see well.
The applicator can be used with lotions, gels, mousses, and other spreadable self-tanners. Very watery mists may be easier to control with a brush or mitt.
Use a steady back-and-forth motion rather than aggressive rubbing, checking your coverage in a mirror as you go.
The handles give you a secure grip while you move the fabric from side to side across your back.
It also keeps most of the product off your palms, which can reduce the risk of noticeably darker hands.
Because this is a reusable applicator, clean and fully dry it after each use before storing it for your next tanning session.
5. AmazerBath Lotion Applicator for Back
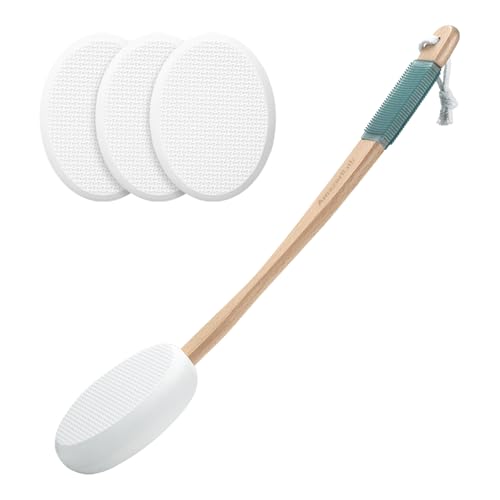
The AmazerBath option is a general lotion applicator rather than a dedicated tanning tool, but its long curved handle makes it useful for self-tanner too.
The 17-inch curved handle provides plenty of reach across the back and can also help with lower legs or feet.
The pad is designed to spread lotion across a wide area. With self-tanner, use a small amount at a time so you do not overload the pad and create darker patches.
Four replacement pads are included, which is useful if you want a clean spare while another pad is drying.
The pads can be rinsed after use, and the hanging loop makes it easier to air-dry the handle between applications.
The textured grip helps make the handle easier to control while you work behind your back.
It is sold for lotion and sunscreen, but the same reach and pad design can be useful for a spreadable self-tanning lotion.
How to Use a Tanning Back Applicator
- Cleanse, exfoliate, and moisturize as needed the day or night before application. Let the skin return to a clean, dry state before you tan.
- Choose a self-tanner that matches the applicator. Lotions, mousses, and gels are usually easiest to control with back applicators.
- Start with a small amount of self-tanner in the center of the applicator. You can always add more if the pad or fabric starts to feel dry.
- For a long fabric strap, hold one end in each hand and move it back and forth across your back in slow, overlapping passes.
- For a handheld applicator, use a mirror to check your shoulder blades, spine, and lower back so you can spot missed areas before the tan develops.
- Continue only until the skin looks evenly covered. Do not keep layering wet product just because you want a darker final shade.
- Let the self-tanner develop for the exact time recommended on the product label before rinsing, dressing, or applying other products.
How to Care For Your Tanning Back Applicator
Wash your tanning back applicator after each use so old product does not dry into the brush, pad, or fabric.
Follow the applicator’s care instructions. Some pads can be rinsed only, while some fabric styles may be machine washable.
Dried self-tanner left on the applicator can transfer unevenly during the next use and make blending more difficult.
Let the applicator dry completely before storing it, especially if it has a sponge, fabric, or wood component.
Tips for Using Your Tanning Back Applicator
A tanning back applicator can be useful beyond the back, especially if reaching your lower legs or feet is difficult.
You can use some applicators on other hard-to-reach areas, but use a smaller mitt or brush where you need more precision.
A long-handled applicator can sometimes replace a mitt for large areas, but a mitt still tends to give better control around hands, wrists, knees, ankles, and feet.
Use a controlled amount of tanning product
Using more self-tanner does not automatically give a better result. Too much product can make the back look darker than the rest of your body or take longer to dry.
Start with a small amount and work it into the applicator evenly before applying. Add more only when you need it for the next section.
Change directions when applying
Use overlapping passes and vary your angle slightly so you are not repeatedly dragging product along the exact same line.
For a strap applicator, move side to side and slightly up or down as needed. For a handled applicator, use broad circular or sweeping motions without overworking the same area.

The area between the shoulder blades is usually the hardest part of the back to cover evenly.
If you notice a missed area before the tan develops, use your applicator to blend a very small amount of product into that spot. Avoid spraying a mist blindly onto your back, since overspray can create a darker patch you cannot see.
Exfoliate first
Self-tanner reacts with amino acids in the outermost skin cells. Very dry or rough areas can absorb color unevenly, which is why preparation matters.
By exfoliating before applying the self-tanner, you remove obvious flaky buildup that could make the finished color look patchy. Keep exfoliation gentle and avoid scrubbing immediately before application if your skin is easily irritated.
An exfoliation mitt or brush can help with hard-to-reach areas on your back. Give extra attention to knees, ankles, heels, and elbows, but do not over-exfoliate them.
Moisturize after exfoliating
Moisturize dry areas before self-tanning, especially elbows, knees, ankles, and hands. Let the lotion absorb fully so the skin is not wet or slippery when you apply the tanner.
A thin layer of moisturizer on very dry spots can help prevent those areas from developing noticeably darker than the surrounding skin.
Moisturizing after the tan has developed can help keep the skin comfortable and make fading look smoother over time.
Start from your feet
Working from the lower body upward is one practical method because it reduces how often you bend over areas that are already covered in wet self-tanner.
This can help limit creases and accidental transfer while you move through the rest of your application.
Whatever order you choose, use the same amount of product and the same blending pressure from one section to the next.
Know how to remove dark spots
If you end up with a darker patch, do not rub lemon directly on the skin. Instead, let the tan settle, then use a warm shower and gentle exfoliation over the next day or two to soften the contrast gradually.
Follow the self-tanner development time
Do not leave self-tanner on longer than the label recommends in the hope of fixing an uneven application. Some formulas stop developing after a set window, while others are designed to be rinsed at a specific time.
While the tan develops, wear loose, dark clothing and minimize friction. If the product has a guide color, some transfer onto fabric can still happen.
Final Thoughts
A back applicator can make one of the most awkward parts of self-tanning much easier to manage on your own.
Choose between a long-handled applicator for precision and a strap-style applicator for broad coverage. The best option is the one you can control comfortably and clean easily after use.
Your range of motion and preferred self-tanner matter more than having the most complicated tool. A simple applicator used with a small amount of product and a mirror can work very well.
Use light, overlapping passes, check the center of your back before the color develops, and follow the self-tanner instructions instead of trying to correct coverage with extra product.
Related Articles
5 Best Self Tan Sheet Protectors