How To Apply Fake Tanner Without A Mitt – 5 Simple Ways
Listen, I absolutely love self-tanning mitts; in fact, I wrote up a guide of the best ones, but sometimes we don’t have that luxury.
In this quick guide, I’ll cover three of the best ways to apply self-tanner without a mitt.
5 Simple Ways To Apply Self-Tanner Without A Mitt
Self-tanning mitts offer significant convenience, and you will likely achieve a slightly better tan once you become accustomed to using them.

So, if you’re interested in trying them out, check out my guide on self-tanning mitts.
Many people opt to just use their hands, which is absolutely an option.
However, using your hands can lead to orange hands and a slightly less even hand.
Don’t worry, though; if you’re planning to use your hands, we’ll discuss a few tips below to do it effectively.
If we don’t have a mitt around, the best thing to do is actually try and replicate the benefits the mitt provides with things we already have around our house. So, let’s talk about a few of those.
Also, stick with me until the end; I have some great tips to apply self-tanner without a mitt and achieve the perfect tan!
1. Use A Rubber Glove
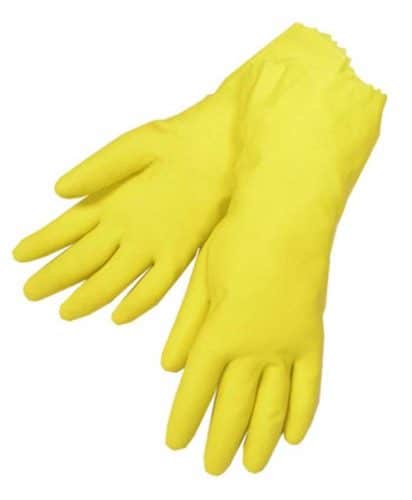
Sounds a bit silly, right? However, using a rubber glove actually works quite well for many people; in fact, a small few actually prefer it.
The problem with some self-tanning mitts (or other alternatives) is that they absorb a significant amount of the self-tanner.
This not only wastes it but can also cause it to apply unevenly.
Simple rubber gloves (like these ones from Amazon). Simple rubber gloves won’t absorb any of your sunless tanning product, allowing you to get the full value out of it.
Many fake tanning mitts also lack finger holes; in fact, almost none of them have them.
This works great for most of your body, but it’s harder to tan in certain places, which can make it a bit tough. Rubber gloves work well for these areas, providing us with a great deal of flexibility.
Rubber gloves also work well for self-tanning because you can simply wash the product off afterward.
If your self-tanner doesn’t contain any bronzer or guide color, nothing should stick to the glove at all, allowing you to reuse it multiple times.
They also won’t allow any of the product to get to your hands, so you don’t need to worry about vigorously washing them afterward to prevent that orange color!
2. Use A Sock

This is another fan favorite for applying self-tanner.
Many socks can actually work pretty much like a mitt, allowing you to apply self-tanner without over-tanning your hands.
It’s usually best to turn your sock inside out, apply the self-tanner directly to your skin, and then spread it out using the sock.
You’ll probably find that with a sock, the tan goes on a bit smoother than it does with a rubber glove, since the fabric almost always holds some product.
Think of painting a wall with a roller versus a spatula (okay, that is a terrible analogy, but you get the point); the roller will always have some product, allowing it to go on nicely and evenly.
I’ll also mention that if you stroll around tanning forums online, like I do (weird, I know), you’ll find that many women actually like to use slipper socks like these for applying their self-tanner.
They tend to be a bit thicker and will provide better protection for your hands. However, one of the benefits of using socks is that they are inexpensive and can easily be replaced after a few uses.
However, be careful if you’re using your socks or someone else’s, as you should never reuse them on your feet again.
Even after going through the wash (which you should never do), self-tanner can be left on them. There is a hilarious number of photos online these days of people who ended up with extremely tanned feet.
3. Use Your Hand
I know, sounds scary, right? However, this is how the vast majority of people start to apply fake tanner, and I think everyone is ok.
In fact, using your hands to apply sunless tanner can actually work really well; you just want to make sure you do it the correct way.
First, follow your normal routine: shower, exfoliate, shave, moisturize, and so on. (I won’t delve too deeply into this here, as I’ve written about it extensively elsewhere.)
After you’ve completed all your preparation, apply some self-tanner. (I like this one from Amazon) to your hands and then apply it liberally and evenly to your entire body.
Ensure that the dryer areas, such as your knees, elbows, and ankles, don’t receive too much self-tanner.
Once you’re satisfied with the spread of your tan, it’s time to wash your hands immediately.
The best way to do this is with a fairly rough exfoliator, such as a sugar or sand scrub. Rub it vigorously to thoroughly scrub off the self-tanner before it has a chance to set in.
If you do this promptly and thoroughly, you shouldn’t end up with any self-tanner left on your hands.
Make sure you don’t skip this step, though. I’ve seen (and experienced) my fair share of orange hands!
4. Try Using Cling Film
I know, I know, this one sounds really weird, but it actually works quite a bit better than you’d think.
Take some simple cling wrap, like Reynolds, wrap your hand in it completely, and you have yourself a make-shift fake tanning mitt.
Make sure to wrap your hand really well, leaving no exposed spots, but avoid wrapping it so tightly that you cut off circulation.
The smooth surface of the cling wrap will actually apply the self-tanner really well.
There are some people who actually prefer using this method over anything else, so I’d encourage you to give it a try!
You can see my full guide on using plastic wrap to apply self-tanner. right here.
5. Try Self-Tanning Wipes
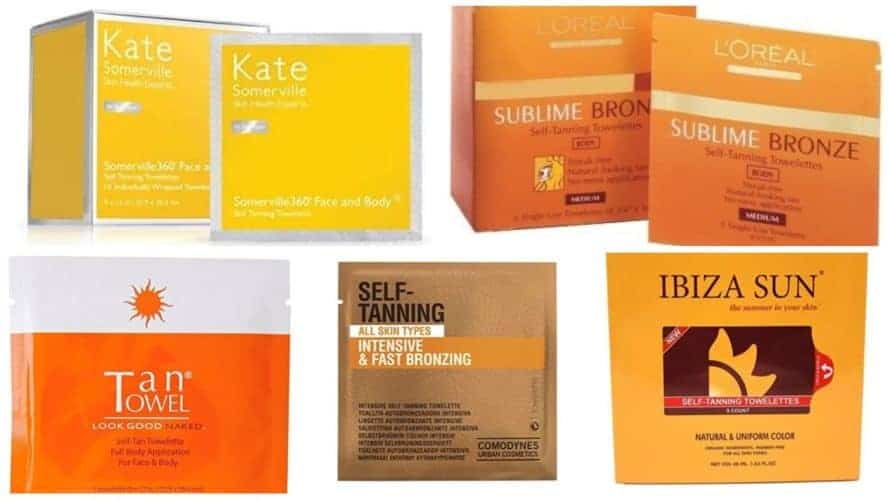
Self-tanning wipes are becoming increasingly popular every year, and for good reason — they are fantastic!
If you don’t have a mitt and aren’t happy with some of these other options, self-tanning wipes might be just the perfect fit.
Fortunately, I have a comprehensive guide to the best self-tanning wipes on the market that you can review.
Basically, though, it’s just a high-quality self-tanner on a convenient towelette.
They aren’t quite as cost-effective in the long run, so you’re trading dollars for convenience.
They are perfect for travel, use before an event, or when you just don’t have a lot of time but want a fantastic summer glow.
They also apply really well since they are already on a towelette, and you don’t have to just use your hand.
Word of warning, though: you will still want to scrub your hands really well after using them to avoid any discoloration.
Alright, now that we’ve discussed how to apply self-tanner without a mitt, let’s talk about how to prepare for it!
Remember that the work you do before you apply self-tanner can be just as important as the self-tanner itself!
How To Prepare To Apply Self-Tanner Without A Mitt
Now, no matter what you use to apply your self-tanner, preparing beforehand will make a world of difference.
I chatted with a tanning expert and asked her to tell me exactly what she does before applying self-tanner, and this is what she said:
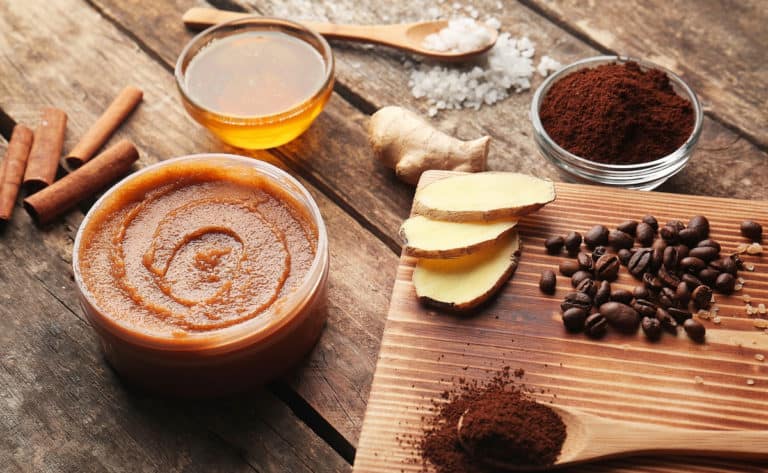
1. Exfoliate!
One of the most important steps you can take before applying self-tanner is to thoroughly exfoliate your skin. (see my complete guide here).
Remember that the main ingredient in self-tanners is DHA. When DHA comes in contact with skin cells, it has a chemical reaction that creates pigment on the skin.
If you have dead skin cells, the tan can appear uneven or blotchy.
Try to avoid using oil-based exfoliants, as they can create a film on the skin. Instead, either use something like a sugar scrub or, my preference, an exfoliating mitt.
I just use mine in the shower before I apply the self-tanner.
2. Careful With Waxing And Shaving
This one is important, especially when you’re applying self-tanner without a mitt.
It’s essential to perform any hair removal at least 24 hours before applying the self-tanner.
When you shave or wax, it can inflame the skin and cause micro-cuts.
You want the skin to calm down completely before applying any product.
It’s also crucial that you refrain from waxing or shaving after applying fake tan. This defeats the whole purpose.
The DHA is located on the outer layer of your skin.
If you shave right after the tan has set, you’ll remove most of the tan, causing it to appear streaky and blotchy.
3. Moisturizing The Right Way!
Moisturizing is the absolute key to ensuring your self-tan lasts! Be sure to keep your skin thoroughly moisturized after you apply the self-tanner.
If your skin dries out, it can flake unevenly, causing it to look unnatural. Check out my complete guide to moisturizing to learn more.
However, on the day you plan to apply the self-tanner, try to avoid using any products, such as moisturizer, deodorant, or perfume.
Any of these products can have odd reactions with the product.
4. Invest In Quality Products
You don’t have to spend an arm and a leg, but self-tanner is one of those products where you really get what you pay for.
Now I don’t want to turn this article into a review of the best self-tanning products, but the one I’m currently using and loving is this self-tanner on Amazon.
Not every product is perfect for every person, so it may take some trial and error. Stick with it!
5. Cold Water!
This is a tip that you won’t see just anywhere, but it has worked extremely well for me and others who have tried it.
If you take a shower right before applying fake tan or getting a spray tan, blast your body with cold water immediately after getting out.

Not only does this have health benefits, but it also helps to close your pores and allow your tan to apply super seamlessly. It also helps ensure that the product doesn’t clog any of your pores.
6. Give Your Face Extra Attention
When it comes to fake tanning, your face is what shows the most. It’s important to take your time when applying self-tanner to your face.
I personally like to mix a little bit of moisturizer with my self-tan.
This helps it to apply more evenly and keep my pores from clogging. Whether you’re using one of my DIY self-tanning mitt suggestions above, or an actual mitt, just mix the two together right on the surface of whatever you’re using and then apply.
If you apply all of these tips before, during, and after applying self-tanner, you’ll end up with a beautiful tan, even if you don’t have a mitt.
Any of the ideas above make for great DIY self-tanning mitts and are perfect solutions if you’ve bought self-tanner but aren’t sure how to apply it.
Final Thoughts
You can apply fake tan just about any way you like.
Although using a self-tanning mitt is one of the best ways to achieve results, you can also get similar results with any of the tips I outlined above.
However you do it, just know that applying fake tan really does take a bit of practice, and you’ll get better with each application.
As long as you prepare well, choose a good product, and apply it evenly, you’ll end up with a great tan.
If you have any questions or need help from an expert, please don’t hesitate to reach out.
You can just email me at: [email protected].
Your Friend,
Kate
Related Articles
How To Make Fake Tan Dry Quicker